| ||||||
|||||||||
Stiff Chain Syndrome |
Stiff Chain Syndrome |
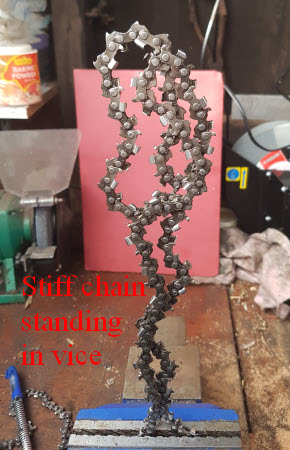
What is it? This is a problem often encountered by chainsaw carvers operating chainsaws equipped with specialised carving bars. It manifests itself in the chain becoming stiff and unable to run round the bar tip easily. The more the bar and chain is used, the hotter and stiffer the chain becomes, until it eventually seizes up and refuses to run round the bar altogether. It may even snap. It will also, almost certainly, destroy the tip of the carving bar at the same time. When the bar and chain have been taken off the saw, it’s found that the rivet bearings have all stiffened up and the chain will not flex loosely any more. It can be so bad that the chain can be pulled straight and pointed into the air as though it were a solid strap. If the bar is checked, it will most likely be badly chipped and burred behind the nose on one, or both sides of the bar.
|
|||||||||
|
 |
||||||||
If both bar and chain are as bad as has just been described, then it is likely that both are write-offs and best thrown away. This is a great pity as the bar in particular is usually very expensive. If the problem is identified relatively early on, then it can possibly be remedied and the bar and chain recovered.
How can the problem be avoided?
|
|||||||||
Wrong pitch or gauge of chain for the bar Wrong angle of entry between sprocket and bar New chain on old drive sprocket Wrong drive sprocket Faulty oil pump Dry, hard timber Lots of plunge cutting (boring in) |
Unmodified teeth on chain Wrong tension of chain New chain on old, undressed bar Incorrect modification of depth gauges Lubrication channels from saw to bar groove incompatible Jigsawing Lack of maintenance of chain and bar in use |
||||||||
I will now deal with these points one at a time:
|
|||||||||
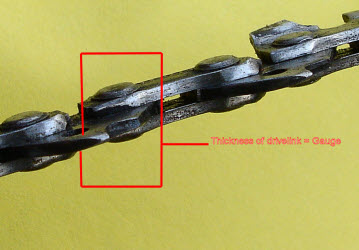
Wrong gauge of chain for the guide bar.
Gauge, the width of the groove in a guide bar. Or, the thickness of a drive link on a chainsaw chain.
|
 |
||||||||
If it is a new bar of .043” gauge, then a new chain will not easily fit in the groove if it is .050”. Not at all if it is an even thicker gauge. If it is a new bar of .050” gauge then the .058” (and the .063”, though these are not used on carving bars anyway) gauge chains will not fit because they are too thick for the groove. Problems can occur when say, a worn 0.043”gauge bar has a new 0.050”gauge chain fitted to it. It may run round the bar well enough, due to the bar groove having been worn more than 0.43” wide. The problem is the same with a worn 0.058”gauge chain into a new 0.050”gauge bar. Also the same for new 0.058”gauge chains into worn 0.050”gauge bars. In the larger gauges, with standard bars, the same sort of problems can occur. If the bar is very worn, then things might run smoothly. However, if the chain is running too tight in the groove, then the bar can overheat. The overheating causes problems, the bar can soften on the rails, the chain can also soften as it overheats too. This causes burrs on both bar and chain with the burrs on the bottom of the chain leading to stiffening of the chain.
|
|||||||||
|
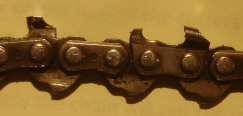
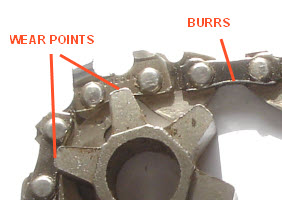
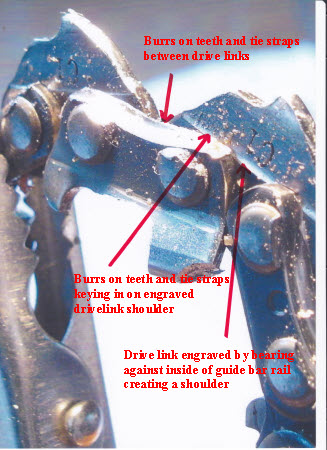
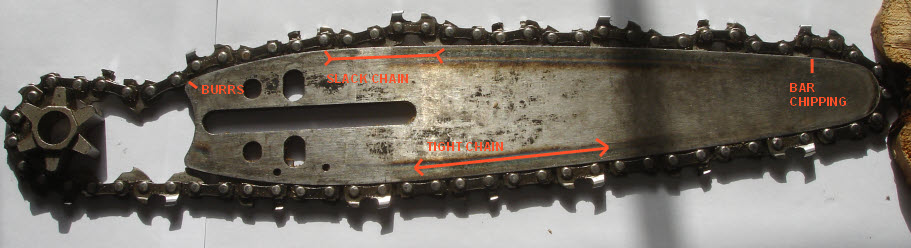
This picture is of a well worn chain that has been run on a badly maintained guide bar. It shows well developed burr formation that is similar to that which could be expected on a guide bar with a tight running chain that is overheating and wearing extremely fast. Note how the guide bar creates an engraved shoulder on the drive link. The burrs created at the bottom of the chain then key into this shoulder, as well as projecting into the gap between the drive links. These burrs then prevent the chain from flexing properly. The stiff chain can now cause additional damage to the guide bar, which adds to the damage on the chain. The whole process can become a runaway situation that rapidly leads to seizure of the chain and possible breakage. |
||||||||
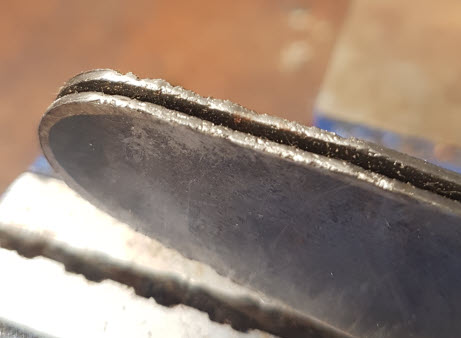
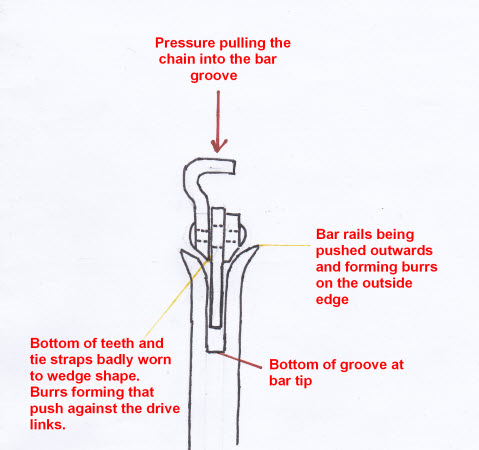
As well as the ongoing stiffening of the chain, the excess heat at the tip of the bar, plus the extra tension being borne by the chain being pulled round against the added friction, can cause the rails at the nose of the bar to splay apart. The chain sinks further down into the groove and develops a marked wedge shaped pattern on the bottom of the tie straps and teeth. This pushes in towards the sides of the drive links and also adds to serious stiffening of the chain.
| 
| ||||||||
In this case the chain is a write-off as there is no way the bottom of the chain can be squared up again. To avoid the problem caused by a wrong chain in given gauge of bar, pay careful attention to bar chain combinations. If the chain gauge is too small for the guide bar groove, then the chain is able to rock from side to side possibly making a straight cut difficult to achieve. | |||||||||
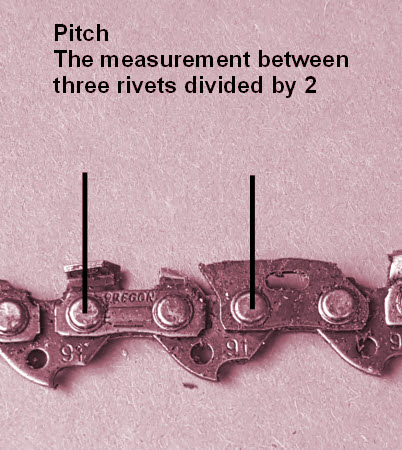
Wrong pitch of chain for the carving bar. In short, the pitch of a chain can be too long to work properly on a carving bar with a small nose radius.
| |||||||||
|
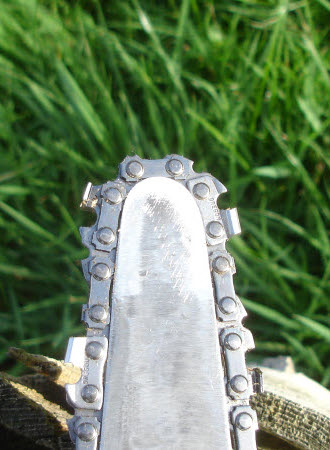
| The pitch of a chain is the distance over 3 rivets divided by 2. The main ones being 1/4" pitch, 0.325” pitch, 3/8”pitch, 3/8” low profile, 0.404” pitch. The 0.404 pitch isn't used on carving bars | ||||||||
. A 3/8" pitch chain on a dime bar. It can be seen that the tie strap is very long relative to the nose of the bar. The bottom of the tie strap is bearing on the bar only in the middle where the gap between the drive links are. This area will wear quite quickly leading to burrs that fold inwards (as well as outwards) and interfere with the easy flexing of the drive links. |
| ||||||||
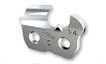
Carving guide bars come with four different nose types:
| |||||||||
|
| ||||||||
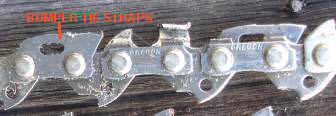
The chains for the bars have to be the correct gauge (0.043 or 0.050). It is also assumed that the teeth have been modified by having the rear third removed to enable them to cut on the nose of a carving bar. They must not have bumper tie straps.
|
|||||||||
Unmodified teeth on chain |
|||||||||
Most chain used on carving bars comes from the dealer with tooth configuration set for use on standard guide bars. One exception is Stihl “Rapid Micro Special” chain which is specially made for use on carving bars and is unlikely to need any modification. Other chains used on carving bars will require to have about one third of the rear of the tooth removed. All chains designed especially not to cut at the tip of the bar (consumer chain/non professional) are not suitable for use on a carving bar.
|
|||||||||
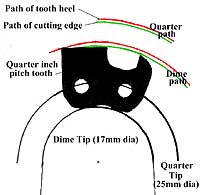
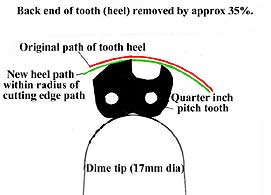
Shown here is a scaled up picture profile of a new quarter inch pitch cutter from a saw chain as it would sit on the carving bar while travelling around the tip of the bar. The path the cutting edge takes is marked in green; the path the rear of the tooth takes is marked in red. The tooth is shown as it would be on the Dime Tip. The dimensions and the paths taken by the same tooth on a Quarter Tip are also indicated. It can be seen that the path the cutting edge takes is within that of the path of the tooth rear. This would result in the failure of the tooth to bite into the wood. It would therefore be incapable of achieving a plunge (boring) cut. In order to rectify this problem the shape of the tooth must be modified. |
|||||||||
By removing the rear portion of the tooth, the cutting edge is able to actually contact the timber. This enables it to cut far more efficiently and with considerably less friction. The figure of 35% of tooth to be removed is a minimum. It might also be beneficial to reduce the depth gauges of the chain slightly more than that recommended by the manufacturer (DO NOT REMOVE THE DEPTH GAUGES). In the diagram here the rear of the tooth is incorrectly referred to as the heel. The heel is at the bottom rear of the tooth bearing on the guide bar. |
|||||||||
These
modifications relate only to the use of chains on carving bars and should not
be made to any chain used on standard chainsaw guide bars. |
|||||||||
|
|||||||||
|
|||||||||
If unmodified standard chains are used on carving bars, the first thing the user will experience is the difficulty in plunge cutting with the set up. The bar and chain will be constantly overheating when this is attempted. This overheating and stress on the chain will cause the bottom of the chain to burr badly and the chain will stiffen up. What is happening is that the tooth is too long to be able to take a bite going round the tip of the bar (because of interference from the rear part of the tooth top plate). In order to bite at all the tooth has to rear up on its heel to be able to cut. This first causes a lot of wear on the heel of the cutters, as well as the tie straps fixed to the cutters, and makes the bottom of that part of the chain stiffen up first. As the chain stiffens, it starts to cause damage to the tip of the bar, usually on the top side first. This damage causes the chain to stiffen even more, and to burr on the bottoms of the other links too. More heat is generated and eventually the chain will not run round the bar due to the seizing up of the whole chain. If the problem isn't addressed soon enough both the bar and chain will be beyond rescuing, mainly due to the tendency of the chain to be pulled between the bar nose rails. forming a wedge shaped wear pattern on the bottom of the chain.
|
|||||||||
|
|||||||||
The modification to enable a chain to plunge cut more easily appears to have been first mentioned, in writing, in a book called “Barnacle Parp’s Chain Saw Guide by Walter Hall” page 115. |
|||||||||
Wrong angle of entry between sprocket and bar |
|||||||||
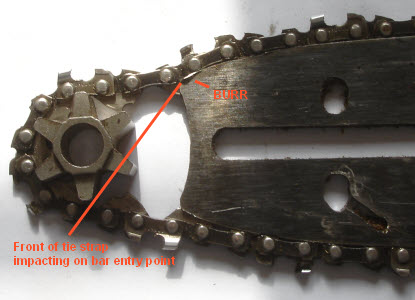
If the diameter of the sprocket is too small relative to the width of the entry and exit points at the base of the bar then the chain may not run smoothly into the groove at the point where it enters the top of the bar. Instead of feeding straight and smoothly onto the bar rails, the bottom of the chain can bash itself against the bar top entry point causing severe burring of the chain bottom, (particularly at the front part of the tie straps and teeth) leading to stiffening of the chain. This effect is exaggerated by running the chain very loose, in which case the chain kinks up as it enters the bar rails. There will also be serious burring and chipping to the bar entry point where the chain was bashing against it.
|
|||||||||
|
|||||||||
This situation can arise when fitting a big carving bar to a small to medium saw, especially if running a spur sprocket. |
|||||||||
If the sprocket diameter is too big, then the chain will run on to the bar nice and straight, but too far along the bar rails. As the chain slackens off a bit during use, it will have a tendency to jump off the bar rails, especially when the saw is turned on to its side before operating the throttle. |
|||||||||
Wrong chain tension |
|||||||||
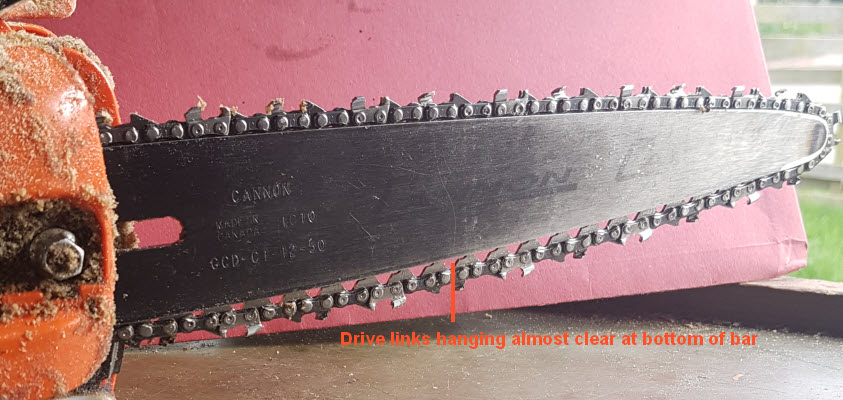
Carving bars have to be run with a relatively loose chain. However, having too loose a chain can cause other problems. I have found the best chain tension with a 12” carving bar to be when the chain on the bottom of the bar has the drive link tips just about entering the bar groove half way along the bar. This is with a chain that has not started to stiffen up and when the chain has been pulled clear of the bar and allowed to snap back. It will loosen off again after about half a days carving or so and will need to be re-tensioned.
|
|||||||||
 |
|||||||||
If the chain is run too loose, then first of all it is likely to jump off the bar rails. It also allows the teeth to rise back too far when running through a cut. This causes lots of wear on the tooth heel. If a lot of work is occurring on the tip, like plunge cutting, the chain on the top of the bar, while travelling into and along the bar, becomes very loose and kinked, while the chain on the bottom of the bar is running tight. This is because the drive sprocket is pushing the chain out on the top of the bar and pulling it in at the bottom, while work on the nose of the bar is trying to stop the chain. This loose chain on the top of the bar can cause damage from hitting the entry point of the bar and by chattering against the top of the bar nose and chipping the hard facing (stellite) of the bar nose. When the working pressure is taken off the bar tip, with a chain that has started to stiffen, it then starts to cause damage to the bottom part of the bar nose. This is because the stiff chain coming round the nose of the bar wants to keep going round due to the tight links. It then chatters against the first point of contact chipping and wearing the hard facing. All of the chipping of the nose of the bar accelerates the burring of the bottom of the chain and leads to a very fast developing stiff chain.
|
|||||||||
 |
|||||||||
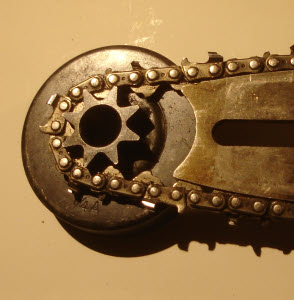
Illustrating the way the sprocket pushes out chain at the top of the bar while pulling in chain at the bottom, when the tip of the bar is cutting. This would be more exaggerated with a chain that is too loose.
|
|||||||||
If a chain is too tight (as when it has been tensioned like a standard, solid nose bar) This greatly accelerates all of the wear that can generally be expected when using a carving bar and chain. This tension will cause too much overheating of the bar tip (it is normal that the bar tips turn blue due to periodic overheating of the tip, this won't be a problem, prolonged overheating is the problem). The first sign is that black, burned, chain oil will constantly be thrown off the end of the bar (this is normal for a newly installed bar and chain while they both bed in, but lessens a lot after a half hour or so). The tip of the bar will be very hot so that the chain oil can be seen to be actually boiling when in contact with the tip. If left running this way, it will ultimately cause the bar rails at the tip to splay out and the chain to sink progressively between them. The bottom of the chain will also develop an bevelled wear pattern caused by the splaying of the bar nose. This bevelled wear is high up on the outside of the tie straps and low against the drive links forming a burr that is inclined to push in against the drive links when running on the rest of the bar rails. This ends up stiffening the chain. Toonie bars can cope with more of a conventional, solid nose bar, chain tension. |
|||||||||
New chain on old drive sprocket |
|||||||||
A situation generally agreed to be a bad idea by the saw manufacturers.
|
|||||||||
|
|||||||||
|
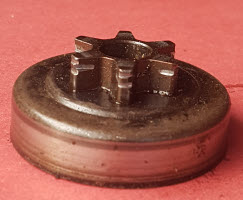
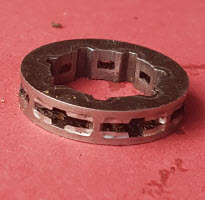
Things are not quite so bad with a worn rim sprocket as it tends to bear over a larger surface area of the chain bottom due to the whole of the bottom of the chain being supported on the sprocket rim. |
|||||||||
| New chain on old, undressed bar | |||||||||
It is important to dress the carving bar regularly during use. With one that is in use for 3-4 hrs every day, attention would likely be needed once a week. The dressing involves removing all burrs from the outside of the rails and checking that they are flat and square to the bar with no chips. This can be done with an ordinary file (apart from the bar nose). The nose of the bar needs to be examined very carefully for chipping, burring, flatness and square ness of rails. Also check that the rails at the very tip of the bar are not splaying out and the chain drive links are not hitting off the bottom of the groove as they travel round the tip of the bar. All of these types of damage can lead to premature stiffening of the chain.
|
|||||||||
|
|||||||||
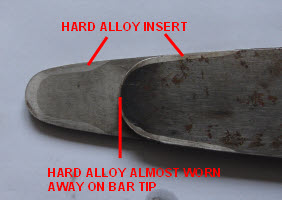
As the nose of the bar is set with a special hard alloy, it is impossible to work with an ordinary file. It may require having any chips ground out, and the rails ground square, on a bench grinder. After grinding, a hard sharpening stone can be used to polish up the ground face that the chain will bear on by working it like a file along the length of the bar nose rails. Ordinary burrs on the outside of the rails can be removed with the same hard sharpening stone, leaving a slight chamfer (on the outside of the rails) in place of the burrs. |
|||||||||
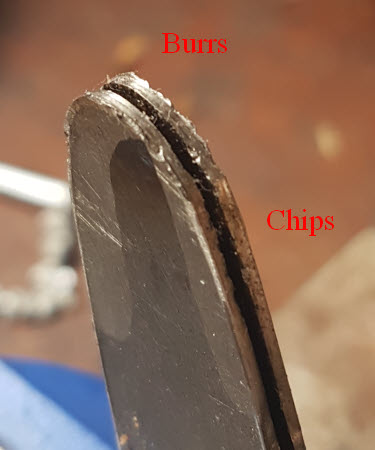
A splayed nose on the tip of the bar is usually accompanied by serious wear from the outside of the rails bevelling in deeper to the inside. The old chain will have the same wear pattern forming, in effect, a wedge on the bottom of the chain. This wedge pushes out the rails on the tip of the bar progressively further the longer the chain is used. The chain will keep trying to sink further into this deepening groove as well as becoming stiffer due to the burrs on the bottom of the chain pushing in against the tie straps. It’s especially a problem with the smaller bars being used on overpowered saws (12” dime tips on 50cc saws being one example). Any new chain mounted on an old bar with this type of damage will wear very quickly to the same wedge shape and is also very likely to stiffen up after very little work. The chain is a write off if this happens as it will never ride properly on a new, or dressed bar again, it should be scrapped. If there is a lot of hard alloy still on the nose of the bar, it may be possible to rescue the bar. The tip can be squeezed carefully in a vice to push the rails back to their proper groove width (hoping that the hard alloy doesn’t crack or chip) and the bar tip rails can be ground square again on a bench grinder. Then check to make sure there is enough hard alloy left on both sides all round the tip. To finish off, the surface of the rails should be polished with a stone.
|
|||||||||
 |
|||||||||
An old, badly worn chain, on a new bar can possibly cause some adverse wear issues with the new bar. However, it’s most likely that the chain will suffer first by stiffening up or snapping.
|
|||||||||
Incorrect modification of depth gauges
|
|||||||||
If the chain depth gauges on a carving bar are taken down too low this can put too high a load on the tooth and force it to wear down hard on the heel of the cutter. This can lead to the stiffening of the chain, around the heel of the cutter initially. Once the chain starts to stiffen, the usual patterns of other damage start to develop. Before too long the whole chain will stiffen up, followed by all of the other runaway chain and bar destroying symptoms. Any modification on the cutter components that results in a higher load on the tooth, and pressure on the tooth heel, can cause the same stiffening.
|
|||||||||
Faulty oil pump
|
|||||||||
Chains on carving bars are subject to a lot more stress and wear than that of a standard bar and chain set up. It is very important that there is plenty of oil being pumped onto the chain when in use, if not, the chain and bar can overheat too much which will lead to bar damage and a stiff chain. Always check before starting work that the oil is flowing to the bar by holding the tip of the bar over a piece of wood and checking how much oil is thrown off. I personally prefer my adjustable oil pump to be at its highest setting. If there isn’t enough oil coming through it could be to do with a blocked oil tank filter, or a blocked breather, check both before suspecting the pump. It may even be a blockage of the oil holes on the bar and saw caused by sawdust being packed into the bar groove by the drive links (in which case clean out the bar groove and oil holes). With some saws, there is a fixed pickup in the oil tank that doesn’t wobble about to compensate for the position the saw is being used in. This means the saw will not oil when the bar is pointed upwards with only half a tank of oil in the saw. This is a common position for a carver working on a stump. As a saw gets older some of the rubber pipes in the oil and petrol tanks can get a bit stiffer. Not usually a problem with the petrol pickup because it’s quite long, but the oil pickup (being shorter) can fail to bend into some areas of the tank it previously reached, leading to oil starvation. This can sometimes be a reason for a saw not oiling when pointing down, but oiling when pointing up, or the other way around. In the worst case, the badly oiling saw may need a new oil pump.
|
|||||||||
Lubrication channels from saw to bar groove incompatible
|
|||||||||
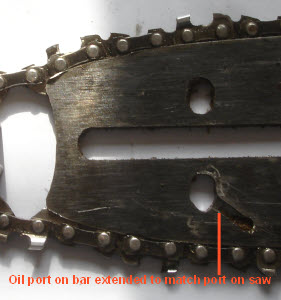
Different makes of chainsaw have different bar mounting configurations. They tend to only be compatible with the manufacturers own brand of guide bar or with a more standard bar manufacturer mount. So a given saw may accept the mounting of a non standard bar, but the oil lubrication channels may not line up. Obviously if the guide bar completely blocks the oiling port on the chainsaw then the chain and bar can never receive any oil (and the pump might pack up because of the lack of throughput). This can often be remedied by observing where the saw oil port lines up on the bar, and grinding a channel in the bar (with a dremel cut off wheel or something similar) to lead from the oil port to the oiling hole in the bar. Or different holes may have to be drilled in the bar to achieve the same purpose.
|
|||||||||
|
|||||||||
Another common problem is that carving bars often have oil holes that are bored all the way through to the other side of the bar. Some makes of chainsaw do not have a side plate that seals against all of the outer side of a mounted guide bar. Even though the saw oil port lines up with the bar oil hole, the oil is pumped to the bar but most of it travels right through the bar instead of into the bar groove and is lost, dripping from the bottom of the sprocket housing. In this case a plate of thin metal may have to be made to seal the outer side of the guide bar.
|
|||||||||
|
|||||||||
Dry hard timber |
|||||||||
Old, dry, hard timber can tax any saw, not just carving saws. A few of the timbers that come up for carving can be very hard even when fresh and full of moisture e.g. Norway Maple, Holm Oak. This will cause problems almost no matter how or what way a carving saw is used on it. About all that can be done is to make sure the bar is kept well maintained, the chain is sharpened often and depth gauges not taken down too far. Avoid a lot of plunge cutting and use the bottom of the bar(pulling chain) in preference to the top of the bar as much as possible. As the chain starts to stiffen, it is important not to let it go too far before taking remedial action. Old, dry timber is often very hard too. Even when it’s not hard the fact that it is dry can cause problems by absorbing the oil from the chain very fast. Make sure the oil adjuster is set to full output. If the timber is old dry and hard too, then make sure that all of the above advice is taken on board when cutting it and try not to force the cutting too much. The chain will almost certainly start to stiffen up far earlier than can normally be expected.
|
|||||||||
Jigsawing
|
|||||||||
Jigsawing is using the saw rather like an electric jigsaw to cut out curved shapes in boards and logs. It is usually carried out by plunge cutting into a board then using the chain on the top of the bar to cut (perhaps along a line) forwards, throwing all sawdust out of the other side of the board away from the operator. Carving saws are just the job for jigsawing shapes out of wooden boards. Animal and insect wings, mortices, signs etc. It’s possible to cut out quite tightly curved objects by repeatedly withdrawing and plunge cutting. This type of cutting isn’t very kind to the carving bar and chain and will lead to a stiff chain far sooner than general carving using mostly the bottom of the bar. The reason for this is that while the top of the bar is constantly in use, the chain is pulled very tightly round the nose of the bar due to the pressure of the teeth trying to cut on the top of the bar working against the drive sprocket trying to pull the chain round the nose and bottom of the bar. If the chain is running particularly slack, then the section between the drive sprocket and the point where the chain is cutting on the top of the bar, can bunch up a bit causing other damage to the chain. Plus if the bar is also being used for a lot of plunge cutting, then this can add to the wear. Only way to prevent it turning into a bar and chain scrapping situation is to keep an eye on bar maintenance (every 8hrs or so of use) and don’t let the chain stiffen up too much before remedial action.
|
|||||||||
| Lots of plunge cutting (boring in) | |||||||||
Using the tip of the bar, as when plunge cutting, puts a lot of pressure between the bottom of the chain at the heel of the teeth and the bar tip. If this is constant, then the heat created can burn the chain oil black (not a problem if it happens now and then) and lead to excessive wear on the bottom of the chain and the tip of the bar. The wear is very similar to that found if using unmodified teeth, low depth gauges or blunt chain teeth. It is important, as above, to keep on top of the bar maintenance and watch out for when the chain might need some attention due to its stiffening.
|
|||||||||
| Lack of bar and chain maintenance | |||||||||
Lack of maintenance will kill standard bars and chains as well as carving bars and chains. Make sure the chain is always sharp. Be sure to take down the depth gauges as the chain is sharpened. Normally this is a little bit more that that recommended by the chain manufacturers for the same chain on a standard bar. This is because the teeth need less restriction on the bite they take going round the tip of a carving bar. Plus there isn’t the same sort of issue with kickback as there would be with a standard bar. Don’t take the depth gauges down too far. Watch out for the chain starting to stiffen up. This normally happens first to the chain around the heel of the cutters. Sometimes this can be fixed by flexing the chain very strongly sideways (both directions) up to the point of nearly bending it permanently. If that doesn’t work it might need the “special” remedial treatment. Check the carving bar for wear about once every 30-40hrs of ordinary use (more often if doing a lot of jig sawing and plunge cutting). Remove burrs and dress square, if needed, try to grind out any chips to the alloy or bar body. Maintain a slight chamfer to the outside of the bar rails. Check for splaying of the tip. Watch out for wearing out of the hard alloy at the tip. Make sure the chain entry point at the top of the bar isn’t being battered and burred. Make sure the oiling system on the saw is working properly and all the oil ways are clear.
|
|||||||||
|
|||||||||
To sum up. It’s almost impossible to avoid the dreaded “stiff chain syndrome” If you are using the carving bar to its full potential. Only if you work in very wet balsa wood is it likely that you’ll get a full life out of one chain, with all the teeth filed down to little pegs. Normally the bottom of the chains wear so thin towards the last third of their potential lives that they snap, and keep snapping in spite of repairs, before they’re filed out. But, I have managed to reach the odd end of life, worn out tooth situation with a very few chains by applying the ultimate “special" remedial treatment on some of them. I hope that the above information helps to make it clearer some of the reasons for the problems with our carving bars and chains that leads to such rate of rejection of these items, seemingly long before they should have packed up or worn out.
|
|||||||||
|
|||||||||
The cure
|
|||||||||
| Or the "special" remedial treatment | |||||||||
The tools you need are: A chain breaking anvil. Or possibly a nice tight new vice that is able to have its jaws adjusted accurately and solidly. |
|||||||||
| Video | |||||||||
For a moderately stiff chain check the links and find the rivets that appear to be stiff (usually the ones at the heel of a tooth). Put these into the appropriate chain breaker anvil (or carefully adjusted vice jaws set to support drive links but let through tie straps). Hold the punch in place over the centre of the stiff rivet and tap it with the hammer to dimple the centre of the rivet. The idea is to loosen the rivet slightly by drifting it just a little bit lower than it was in the tie strap. Check the joint, it should move really easily now, if not try another tap with the punch (but don’t lose the rivet head, which will spall off if you hit the punch too hard). With a chain breaker you can work the lever to just dent the top of the rivet. After this treatment you might find that, after using the fixed chain for a while, other rivets stiffen up. Just do the same again with the new offending rivets. If you have to repeat this, then there may be other issues you haven’t already addressed relating to the causes listed previously. However, if you are innocent of any previous bad practice, you could try loosening the rivets again, from the other side of the chain. In loosening the rivets you are allowing more space between the bearing surfaces of the tie straps and drive links. If you dent the rivet heads too much, you might lose them and find yourself with a snapped chain. Before you fix the break, remember to remove the burrs on the inside of any teeth or tie straps you might re-use.
|
|||||||||
The End (for now) Copyright Mick Burns
|
|||||||||